
I'm headed off to Idaho in the morning - way, way too early in the morning. The trip does involve long stretches of sitting in the car, however, so I'm trying to decide what knitting projects to take with me.
Hmmm...
Chemo cap? Bed sox? Lace?
I'd better hurry as the Engineer has decided we need to leave at 4:00 a.m.
Is it any wonder that one of his many nicknames is, "my Insane Travel Agent"?
Back in nine days.
Thursday, July 29, 2010
Wednesday, July 21, 2010
Sophisticated Circular Needle Storage
My friend, GuiGirl, who has taken up knitting, asked me how I store my circular needles. I said I'd send her a picture. I'm sure she's expecting something very elegant.
Here it is GuiGirl.
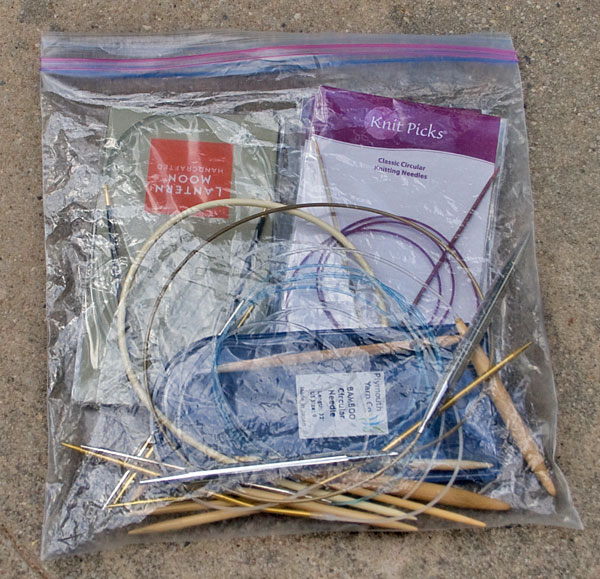
Yep. you guessed right in one. It's a gallon zip lock bag. If I could be bothered to take the time, I would write the size and length of each needle that I generally keep in my fancy storage container on it with a Sharpie, but instead I use a tape measurer and one of those little ruler thingies with holes in it to measure the circs when I need to select one.
Hey, I never claimed I was efficient.
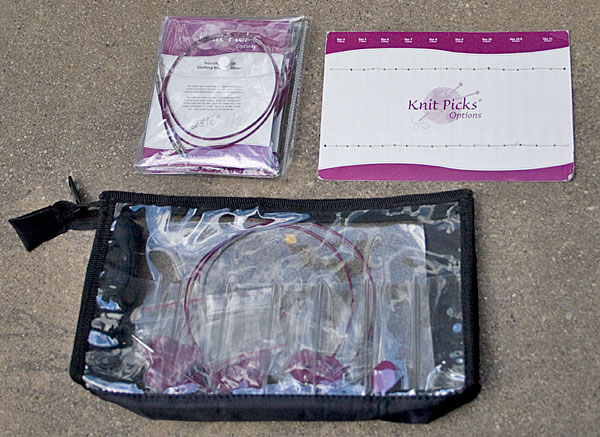
Then I got extravagant and ordered a complete set of Knit Picks Options Harmony Wood interchangeable needles. I love 'em! They're just right for me most of the time; smoother than bamboo, but not so slippery as Addi Turbos.
The Knit Picks set came in a plastic case with the needles elasticed to a card and the cables in little cellophane envelopes that fit into a plastic wallet. There are sleeves on both sides inside the plastic case for the needle tips.
Not being a huge fan of plastic (other than zip lock bags), I bought a fabric needle case at Tuesday Morning for $2.99 on clearance, mostly because I like the blue print fabric. I numbered the needle sleeves in Sharpie and tucked the needles into them. Now I don't have to measure them every time. That's nice. I fold the fabric case in half because just the tips are a whole lot shorter than 14 inch needles. If I ever get around to it, I think I will put a couple of elastic bands with Velcro fasteners in the unused top half, lable them with the length of the cables and clip the cables into the same case.
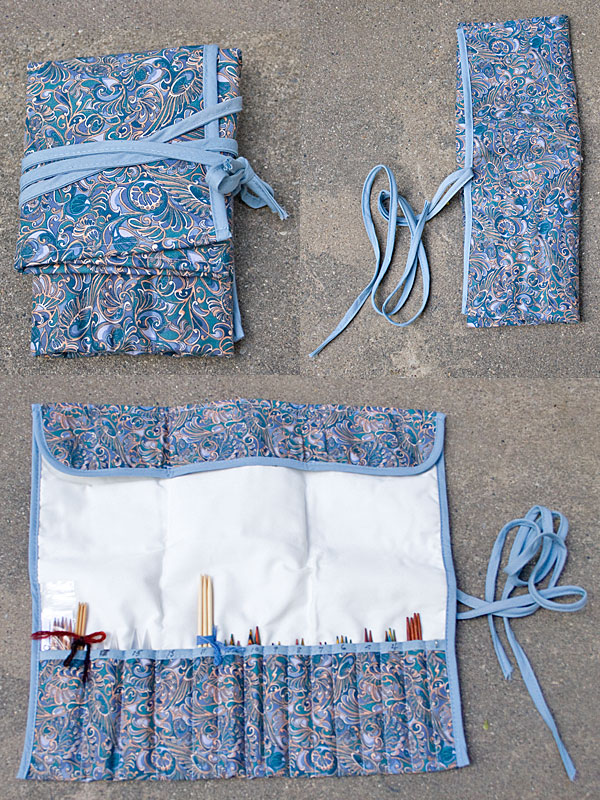
When I get around to it.

As an added benefit, the last little needle sleeve works well to hold the Knit Picks tightening key.
So that's my system.
Except for the needles that I have scattered other places around the house.
Darned if I know where some of them are.
Here it is GuiGirl.
Yep. you guessed right in one. It's a gallon zip lock bag. If I could be bothered to take the time, I would write the size and length of each needle that I generally keep in my fancy storage container on it with a Sharpie, but instead I use a tape measurer and one of those little ruler thingies with holes in it to measure the circs when I need to select one.
Hey, I never claimed I was efficient.
Then I got extravagant and ordered a complete set of Knit Picks Options Harmony Wood interchangeable needles. I love 'em! They're just right for me most of the time; smoother than bamboo, but not so slippery as Addi Turbos.
The Knit Picks set came in a plastic case with the needles elasticed to a card and the cables in little cellophane envelopes that fit into a plastic wallet. There are sleeves on both sides inside the plastic case for the needle tips.
Not being a huge fan of plastic (other than zip lock bags), I bought a fabric needle case at Tuesday Morning for $2.99 on clearance, mostly because I like the blue print fabric. I numbered the needle sleeves in Sharpie and tucked the needles into them. Now I don't have to measure them every time. That's nice. I fold the fabric case in half because just the tips are a whole lot shorter than 14 inch needles. If I ever get around to it, I think I will put a couple of elastic bands with Velcro fasteners in the unused top half, lable them with the length of the cables and clip the cables into the same case.
When I get around to it.

As an added benefit, the last little needle sleeve works well to hold the Knit Picks tightening key.
So that's my system.
Except for the needles that I have scattered other places around the house.
Darned if I know where some of them are.
Sunday, July 4, 2010
The Big Tink - Step by Step
#1. Knit over to where the mistake is and put a stitch holder on your needle so you don't lose good stitches as you work on your repair.
#2. Drop the necessary stitches.
I dropped one full 12 stitch repeat to make sure I didn't make any mistakes following my pattern. Do this one or two stitches at a time - carefully is the byword here.
Since this is lace, I made sure to drop back to a purl row, that way I knew I had the right number of stitches and they were all the same. Dropping back to a knit row would have meant coping with yarn overs and knit togethers - why do that if you don't have to? The green locking stitch marker neatly holds the strands I've unravelled. It keeps the strands from tangling and me from using the wrong strand to knit with.

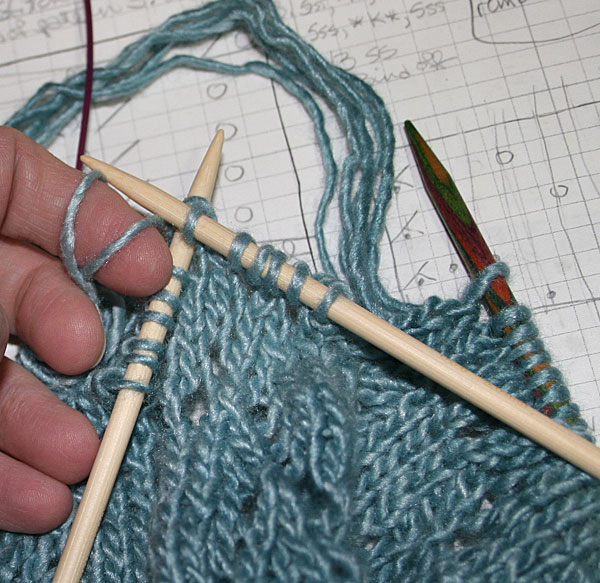
#3. Place the dropped stitches on a dpn one by one as you unravel them.
I've read that you should put the dropped stitches on a dpn that's a size or two smaller than the original needle. I don't agree with this as it boogers up my tension, so I use the same size. It makes it a little tougher to do the last couple of stitches in the group, but I think it looks better in the end. If you have trouble picking up the stitches with the working size needle, use a smaller one, then transfer them.
#4. Put a stitch holder on the needle you haven't gotten to yet so those stitches are secure as well.
The only loose stitches should be the ones you've dropped on purpose. (Since I was knitting this on a circular needle, I just pulled the two sides of the needle through so the stitches were on the cable instead of the needle - I'm kinda lazy.)
#5. Knit.
Carefully select the correct strand of yarn by seeing which is closest to the dpn your stitches are on. Take that one strand out of the locking stitch marker and using another dpn knit it as per your pattern. I use my pinky to control the tension until there is too little yarn to grip, then I pinch it between index finger and thumb.

#6. Purl.
I purl back to try to keep my technique as similar to the original knitting as possible. Purling back is also a good idea because your tension might be different at the beginning of a row where you have more yarn to work with than at the end of the row when the yarn is tight. Working both ways will help even this out a bit. If you hate purling, it is possible to knit the purl rows too by not turning your work and always starting at the right hand side since the work in on dpn's.

#7. Tah-dah!
When you have completed all of your reknitting, just take the stitch holder off your right hand needle, knit the stitches off the dpn, then move on to the left needle.
Your repair probably won't look identical to your original knitting, but massage it a bit both while it's dry and when it's blocking, and nobody besides yourself will ever be able to tell. (Unless, of course, you point it out to another knitter, who will say, "Oh, yeah, I see," but be impressed nonetheless.)
#2. Drop the necessary stitches.
I dropped one full 12 stitch repeat to make sure I didn't make any mistakes following my pattern. Do this one or two stitches at a time - carefully is the byword here.
Since this is lace, I made sure to drop back to a purl row, that way I knew I had the right number of stitches and they were all the same. Dropping back to a knit row would have meant coping with yarn overs and knit togethers - why do that if you don't have to? The green locking stitch marker neatly holds the strands I've unravelled. It keeps the strands from tangling and me from using the wrong strand to knit with.
#3. Place the dropped stitches on a dpn one by one as you unravel them.
I've read that you should put the dropped stitches on a dpn that's a size or two smaller than the original needle. I don't agree with this as it boogers up my tension, so I use the same size. It makes it a little tougher to do the last couple of stitches in the group, but I think it looks better in the end. If you have trouble picking up the stitches with the working size needle, use a smaller one, then transfer them.
#4. Put a stitch holder on the needle you haven't gotten to yet so those stitches are secure as well.
The only loose stitches should be the ones you've dropped on purpose. (Since I was knitting this on a circular needle, I just pulled the two sides of the needle through so the stitches were on the cable instead of the needle - I'm kinda lazy.)
#5. Knit.
Carefully select the correct strand of yarn by seeing which is closest to the dpn your stitches are on. Take that one strand out of the locking stitch marker and using another dpn knit it as per your pattern. I use my pinky to control the tension until there is too little yarn to grip, then I pinch it between index finger and thumb.
#6. Purl.
I purl back to try to keep my technique as similar to the original knitting as possible. Purling back is also a good idea because your tension might be different at the beginning of a row where you have more yarn to work with than at the end of the row when the yarn is tight. Working both ways will help even this out a bit. If you hate purling, it is possible to knit the purl rows too by not turning your work and always starting at the right hand side since the work in on dpn's.
#7. Tah-dah!
When you have completed all of your reknitting, just take the stitch holder off your right hand needle, knit the stitches off the dpn, then move on to the left needle.
Your repair probably won't look identical to your original knitting, but massage it a bit both while it's dry and when it's blocking, and nobody besides yourself will ever be able to tell. (Unless, of course, you point it out to another knitter, who will say, "Oh, yeah, I see," but be impressed nonetheless.)
Friday, July 2, 2010
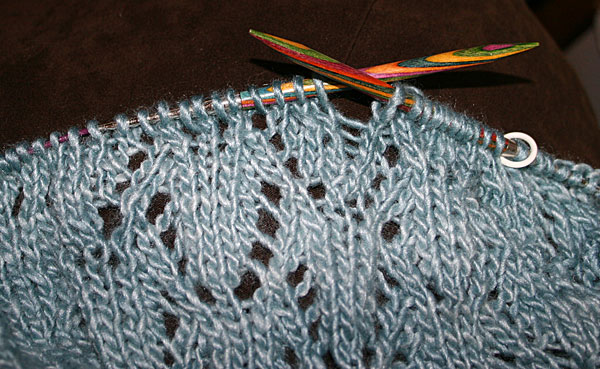
The Big Tink
I'm knitting on a deadline. You know what that means... Big Time Screw-ups. I was eight rows past the boo-boo before I realized I'd made it.
Evil Language!
The pattern has a twelve stitch repeat, so I dropped the whole repeat that I'd slaughtered down eight rows and stuck the stitches on a dpn. I'm going to wait until it's light tomorrow to try to reknit so I can photograph and blog the joyous experience.
Cross fingers for me.
Evil Language!
The pattern has a twelve stitch repeat, so I dropped the whole repeat that I'd slaughtered down eight rows and stuck the stitches on a dpn. I'm going to wait until it's light tomorrow to try to reknit so I can photograph and blog the joyous experience.
Cross fingers for me.
Subscribe to:
Posts (Atom)


